Owner
The Asset Manager enables the owner to structure an asset project into packages and part lists, invite selected companies, and pre-sell those categories before the actual asset purchase—supporting a more competitive overall bid. The collection of bids happens during bidding phases that can be scheduled for categories within a project.
In Asset Manager V2, owners can run independent bidding phases that can be created, extended, or cancelled at any time, and they award results whenever no phase is active (no dedicated “settlement” phase).
Overview
The overview lists your Asset Manager projects with key details and KPIs:
Supplier company (asset owner/consignor, where applicable)
Project name / short description
Available documents (highlighted on the right)
Part Docs hint: a blue Part Docs badge indicates that component documents may be available
Bidding Phase hint: a green dot indicates that a bidding phase is currently active for a certain project
Responsibility marker: a green heart indicates that you have assigned yourself responsible for at least one category in the current active bidding phase
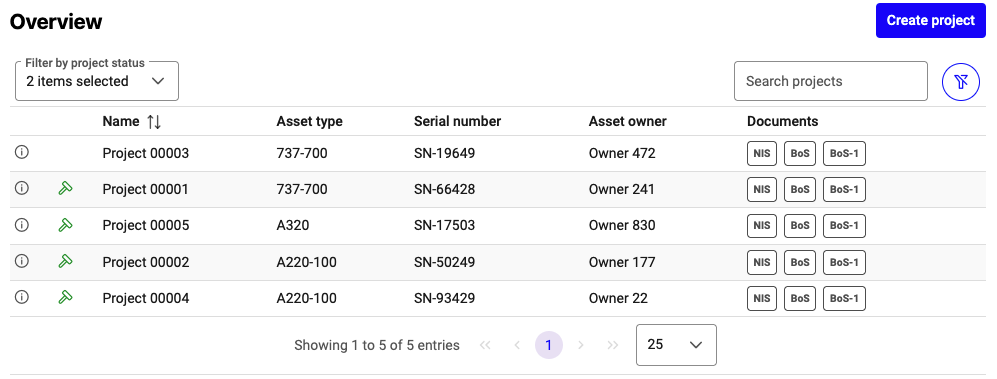
Overview of Asset Manager projects
Use the project status and project phase filters, or the search field, to narrow results. The crossed-out filter icon resets all filters.
Note
By default, cancelled and lost projects are filtered out of the project overview.
Icons in the first column of each row indicate the current status of the project:
Undecided – grey i: project in negotiation; no final decision yet
Won – green check: project awarded to your organization; teardown will start
Lost – red dash: project not awarded; no further steps
Create a New Project
Click Create project and enter the project details.
Mandatory information includes
Asset type (from catalog)
Asset serial number (MSN/ESN, free text)
Project name (pre-filled, editable)
Asset owner (free text, not visible to participants)

Mandatory fields when creating a new project
Additionally, you can toggle buttons to mark a project as either Confidential or Not confidential. Marking a project as confidential will display a confidentiality disclaimer for all participants in the project overview.
Editing a project
Once a project is created you can edit the project details, bid parameters, cost parameters, and documents & attachments.
Optional fields when creating a new project
Note
Once you have created a project, all provided information will be visible to the participants except for the following: Asset Owner, Asset Owner Contact, Bid Parameters, and Cost parameters.
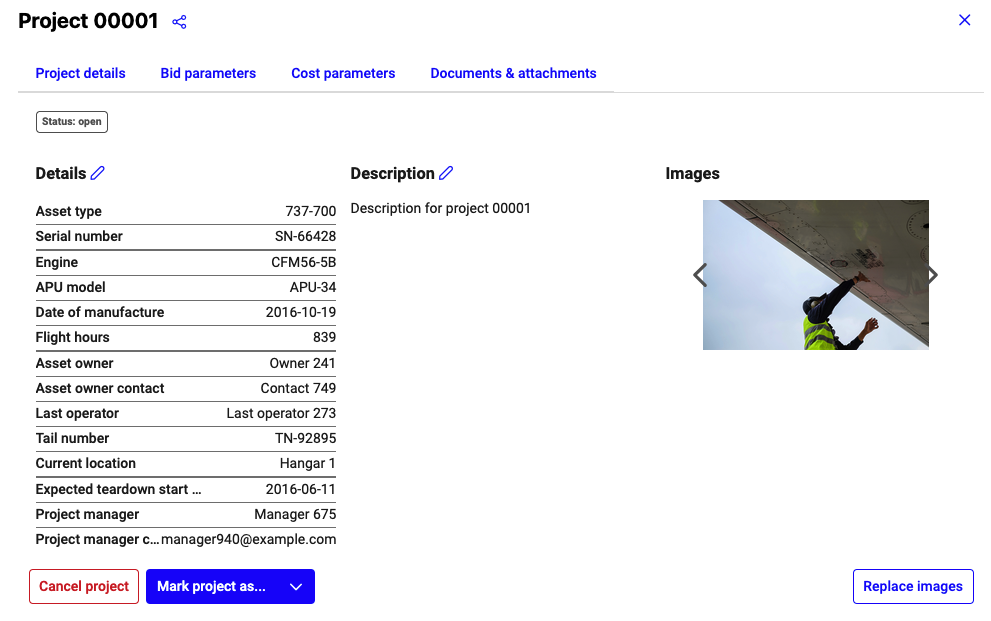
Project details
The project details section includes: - Engine type (selected from a catalog of engines) - APU model (free text input) - Date of manufacture (free text input) - Flight hours (numeric input) - Asset owner contact (free text input) - Tail number (free text input) - Last operator (free text input) - Expected teardown start (free text input) - Current location of the asset (free text input) - Project manager (free text input) - Project manager contact (email address)
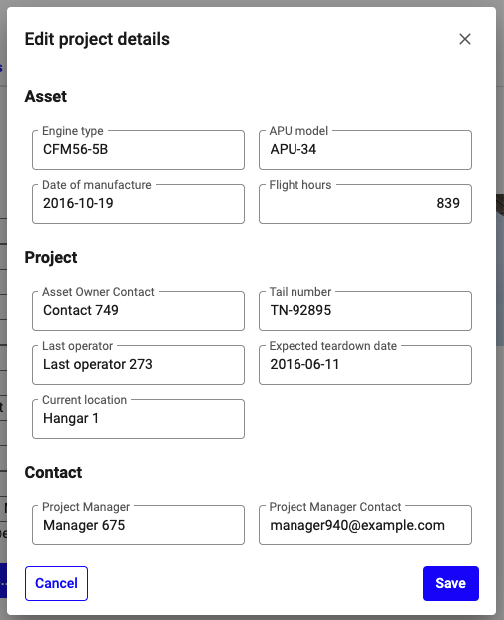
Editing project details
A Project description field where you can enter any additional information on the asset, the process, the bidding terms that might be of relevance for the participants.
You may also upload images to the project to provide visual information on the asset.
Bid parameters
As the owner, you have the option to set bid parameters. This allows you to impose restrictions on the minimum bid:
Absolute minimum bid value
Minimum % of FMV (if your users have Evaluator access)
Optional cap for the minimum bid rule
Note
For users without Evaluator, only the absolute minimum is shown. Minimums are advisory: bids below threshold are flagged for both bidder and owner, but can still be awarded.
Cost parameters
Under Cost parameters, you can edit a teardown cost parameter and a custom asset bid. Both parameters are not visible to participants, they are only used for owner internal statistics.
Documents & attachments
Under “Documents & attachments”, you can: - Upload new documents - Download already existing ones (e.g., Non-Incident Statements, Bill of Sale, and Bill of Sale -1) - Manage project attachments
Documents are only accessible to participants with assigned bids. Attachements are available to all participants.
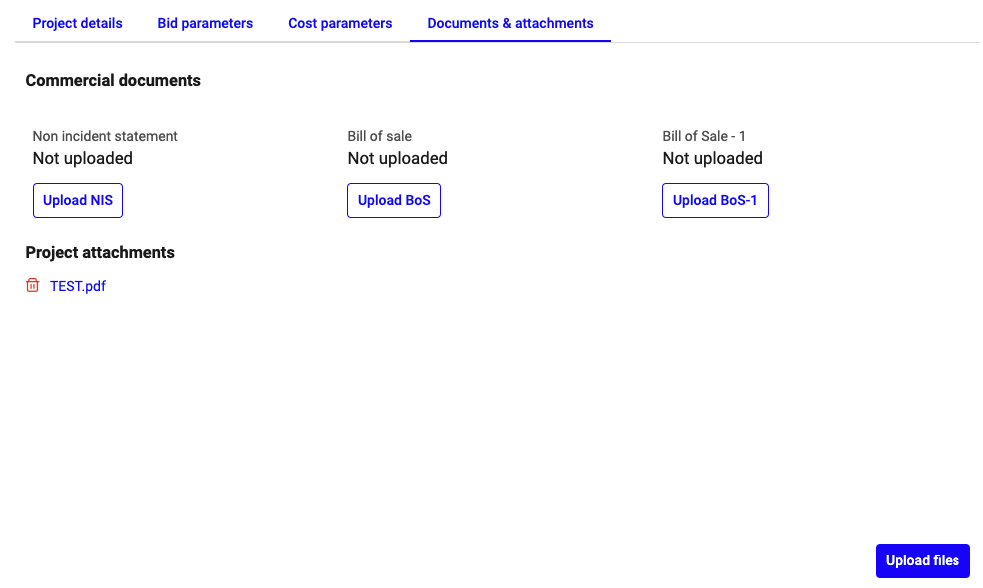
Upload and download commercial documents
Defining Project Categories
The content of an Asset Manager project is organized into categories.
To define an asset category, the following must be entered: - Category type (Package or Part List) - Title - Description
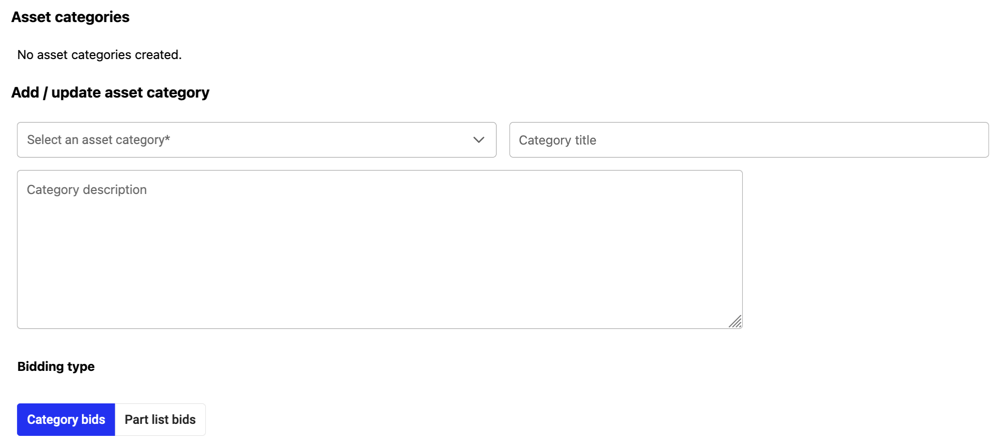
Input fields to specify category
The bidding type can be switched between category bids (single offer for a package) and part list bids (line-item pricing).
Note
In V2 the quantity column is removed. Each row represents 1 unit. To offer multiple units of the same PN, repeat the row.
Note
Do not reuse V1 CSV exports for post-release uploads. After the freeze, download a fresh template/export from the project and then upload your pricing. We have confirmed there are no critical bid deadlines around the window. Detailed guidance and examples will follow in the release notes.
Starting a new Bid Phase
Since V2 there is no longer a fixed timeline for projects. Instead, the bidding process is organized with independent phases.
To create a new bidding phase follow these steps:
Click “Start bidding”
Set bidding starts and bidding ends date and time (timezone-aware)
Separately invite participants: internal (by user) and/or external (by company) for each category or load the pre-defined participant template
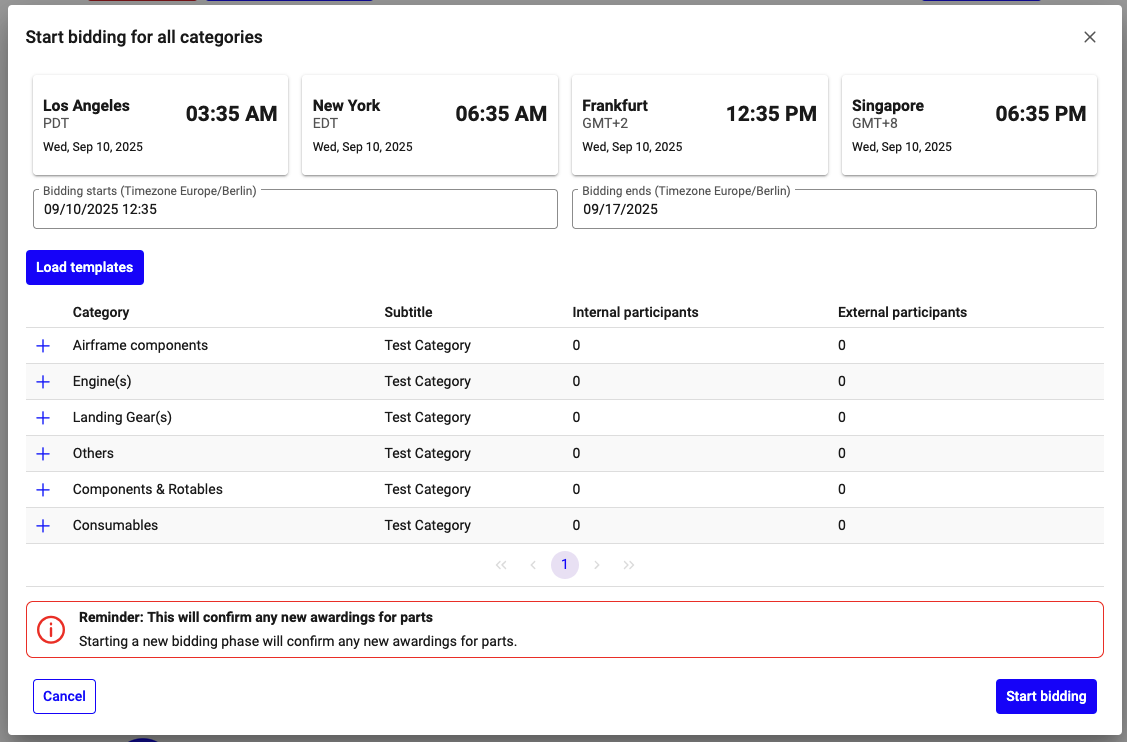
Starting a new bidding phase
There are two types of participants for Asset Manager categories:
Internal participants: These participants are from your own company. You select them on a user level.
External participants: These participants are from other companies. They are selected on a company level, meaning all users from a selected company with access to Asset Manager can participate.
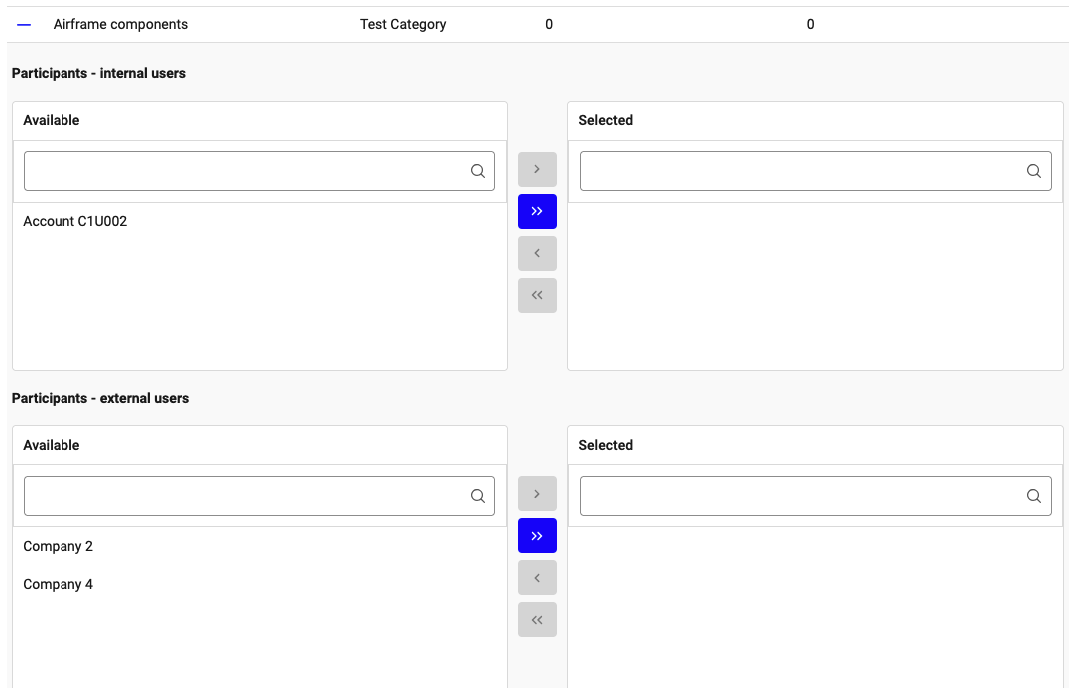
Selection of internal and external participants
You can select available users or companies using the following methods:
To select individual users or companies: Mark one or more entries and click the single arrow button “>”.
To select all available users or companies at once: Click the double arrow button “>>”.
To deselect individual users or companies: Mark the entries you wish to remove and click the single arrow button “<”.
To deselect all chosen users or companies at once: Click the double arrow button “<<”.
Alternatively, a pre-defined participant template can be loaded by clicking on “Load template”. This template can be administrated by the company administrator and defines for each category type the default set of invitations.
Manage Bid Phases
Extend: add days; invited participants are notified
Cancel: ends the bid phase early; participants are notified; reminders stop. So far received bids remain active and can be selected.
Manage the Project
Cancel, win, or lose a project from the project details page.
Cancel project — available only before any bidding has started. Cancelling stops all further actions on the project and notifies invited participants.
Mark as Won / Lost — closes the project with the chosen outcome.
Once a project is cancelled or marked as won or lost, no new bidding phases can be created and no further awards are possible.
Note
After cancellation or marking as won or lost, the project is read-only for bidding/awarding purposes.
Project News
Use Project News to share clarifications, timeline changes, and updates during open phases. News is visible to all invited participants of the project.
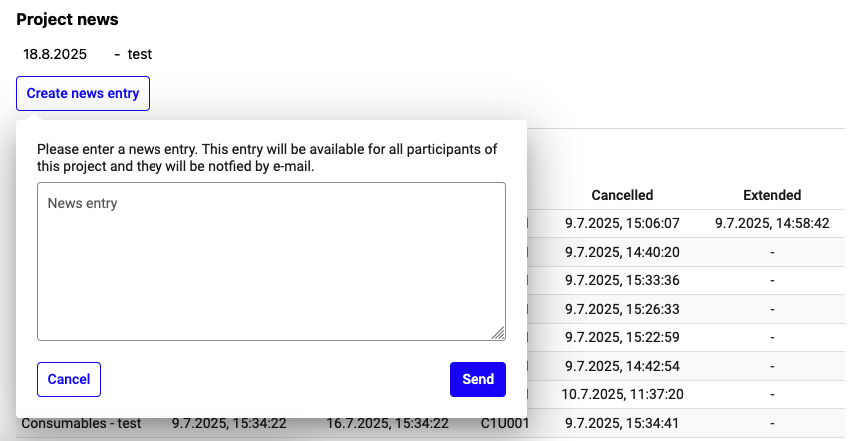
Project news list and create form
Reviewing Bid Results & Awarding
You can review received bids at any time. Awarding is available only when no bidding phase is active. The awarding flow differs for packages (categories) and part lists.
Participant comments are available in the Comments section/tab. Bidders use comments to request details, add conditions, or provide relevant notes.
Note
If the awarding actions are disabled, check that all bidding phases have ended or been cancelled.
Packages (Categories)
Open the category and review bids.
Click the checkmark icon to select the winning bid and award the category to that bidder.
Use Reset awarding to clear selections before confirmation.
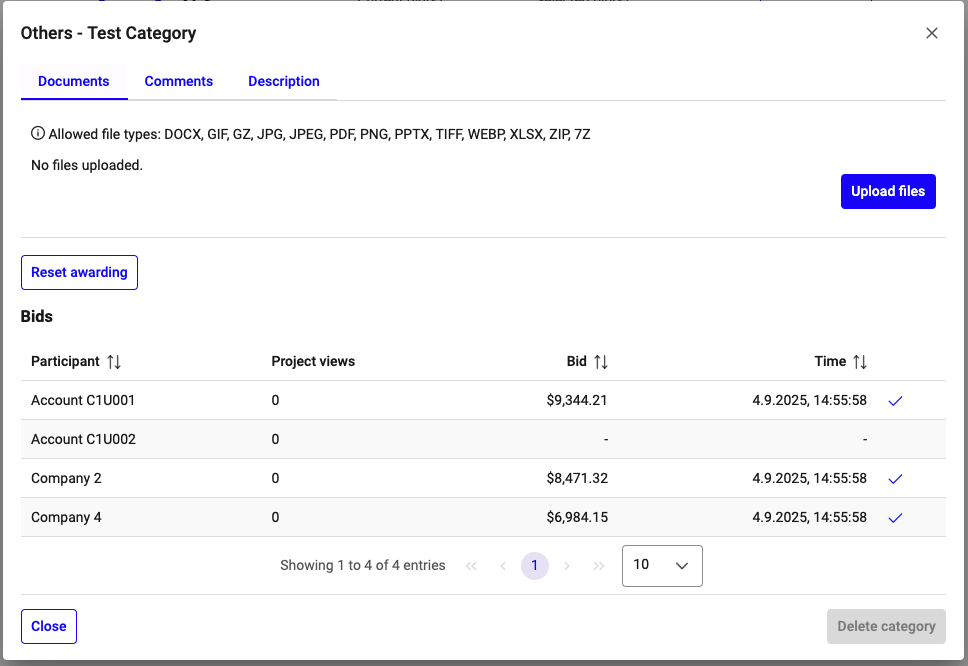
Bid review and awarding for categories
Part Lists
Opening a part list category shows a bid summary first—grouped by bidder (internal: by user; external: by company) with the count and total value of received and selected bids. The Comments tab lists participant comments relevant to this category.
Below the summary, the line-item view lists each material with received bids, ranked high-to-low by value.
You can either select a winning bid per line by checking the checkbox in the row. Or apply one of the available auto-selection rules:
Highest bids — select the highest offer per line.
Internal first — prioritize internal bidders where present.
Reset — clear all line selections.

Bid review and awarding for part lists
Note
Selections remain editable until you confirm the award. After confirmation, selections are locked and the result is communicated to the participant. Awarded part list items are excluded from future bidding phases.