Project Owner
The project owner in a teardown project usually is the entity that owns the asset that is teardowned by the teardown operator. As project owner in the Teardown Module, you can set up new projects and update the state of existing teardown projects by uploading part list updates.
Create New Project
This guide leads you through the process of creating a new teardown project on MRO SmartHub. Users have the option to import an existing Asset Manager project or start a new project. Below are the steps and options available in the creation screen.
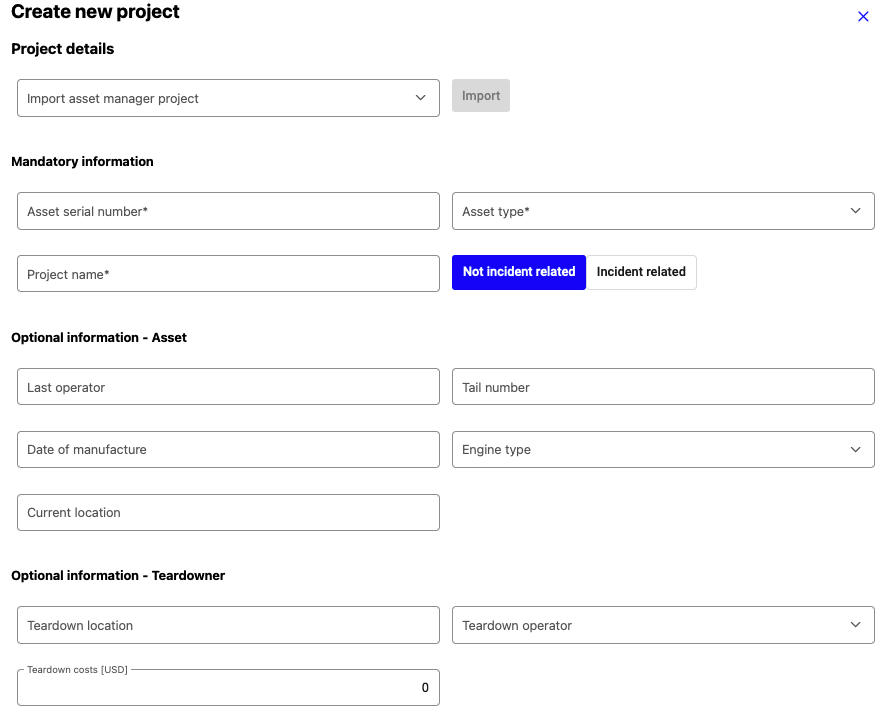
Create new teardown project - part 1
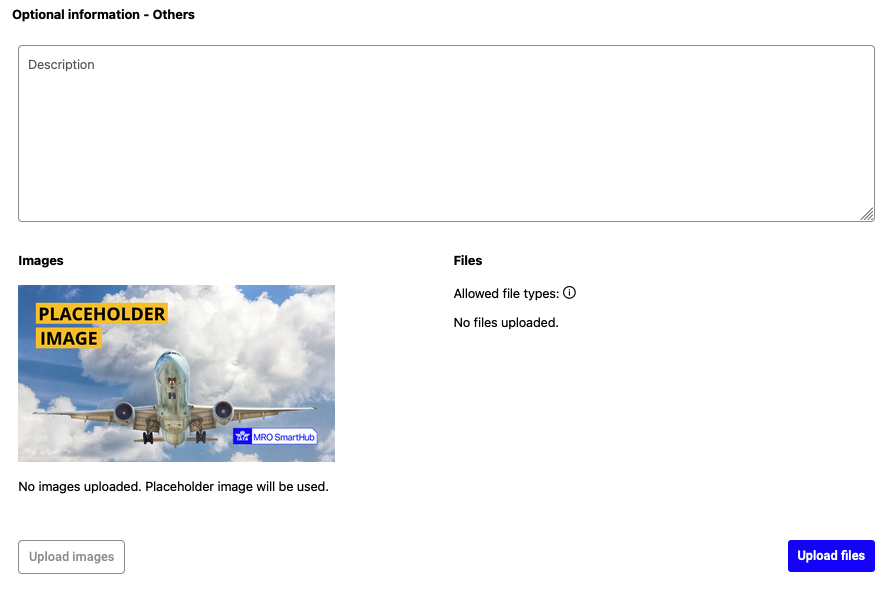
Create new teardown project - part 2
Option 1: Importing an Existing Asset Manager Project
Open the ‘Import asset manager project’ drop-down menu and select an Asset Manager project. Please note, that only projects that completed the settlement phase and are marked as won will be shown.
Then click ‘Import’ to automatically fill in the project details using the available information from the Asset Manager project. Only the teardown-related information has to be entered.
Option 2: Creating a New Project From Scratch
Fill in the Project details section with all mandatory fields:
Asset serial number
Asset type
Project name
Add any optional asset information to assist in the project’s management, such as:
Last operator
Tail number
Date of manufacture
Engine type
Current location
Input optional teardown details:
Teardown location
Teardown operator
Teardown costs (USD)
In the Optional information - Others section, provide a project description, and upload any supporting images or files.
Project Timeline
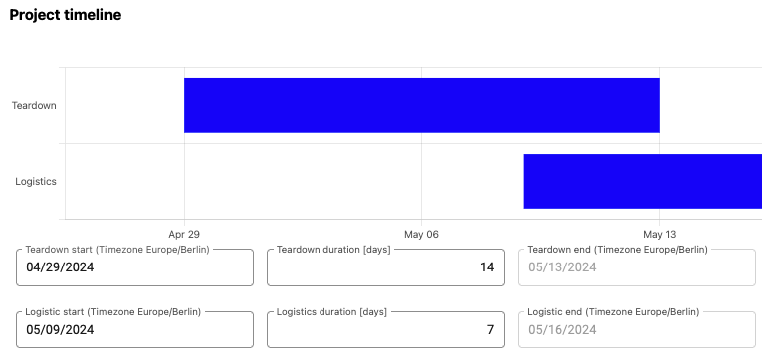
Create new teardown project - timeline
The project timeline sets expectations for participants, indicating the timing for the two main activities: teardown and logistics. This helps ensure that everyone involved is aware of the expected timeline and can plan accordingly.
To support planning, the Teardown Module will send automated notifications to the participants when some key milestones and planned activities happen.
Part List and Part List Upload
Download the CSV template for the part list by clicking Download template.
Populate the template with part details relevant to the teardown. The columns partNumber, serialNumber, ataChapter, status, assignedTo, assignedPriceUsd are mandatory. Details can be found below.
Upload the filled part list by selecting Upload part list.
To complete the upload, the values entered in assignedTo have to be translated into users and/or companies of the IATA MRO SmartHub. After uploading a part list, an interface to match the values is shown.
Each entry in assignedTo will be shown in a table and you can either select a user from your company (internal) or select another company (external). Only assigned parts will be shown to their respective assignees.
Review all uploaded details before saving to ensure accuracy.
Template columns
partNumber - mandatory - Part number of the material.
serialNumber - mandatory - Serial number of the material.
ataChapter - mandatory - ATA chapter the material belongs to.
description - optional - Verbal description of the material.
tag - optional - Tag information in case the material has been already removed.
removedPn - optional - Information on an alternative material in case removal has already happened.
removedSn - optional - Information on an alternative serial in case removal has already happened.
status - mandatory - Information on the status. For the initial upload this is most likely “to_be_removed”. Details on the allowed status values can be found below.
isAlternatePn - optional - Boolean value (true/false) indicating if the removed part number is an alternate part number to the original part number.
manufactureDate - optional - Manufacturing date of the removed part number.
manufactureLocation - optional - Manufacturing orgin of the removed part number.
logisticsPalletId - optional - Number of the crate/pallet the part number is packaged for shipment.
logisticsBoxId - optional - Number of the box on the crate/pallet the part number is packaged for shipment.
logisticsPalletStackable - optional - Indicating if the crate/pallet is stackable.
logisticsPalletWeight - optional - Weight of the crate/pallet.
logisticsPalletHeight - optional - Height of the crate/pallet.
logisticsPalletWidth - optional - Width of the crate/pallet.
logisticsPalletLength - optional - Length of the crate/pallet.
isDangerousGood - optional - Indicator if the part number is a dangerous good and requires additional services.
unDgrNumber - optional - UN number for dangerous goods. For a full list see https://en.wikipedia.org/wiki/UN_number
purchaseOrder - optional - Purchase order reference from the buying company.
assignedTo - mandatory - Internal or external partner the material has been assigned to (the designated receiver of the material).
assignedPriceUsd - mandatory - Assigned price/valuation to the material. Necessary for analysis later. Expected format is a number without currency sign and “.” as decimal separator.
Matching Assignments
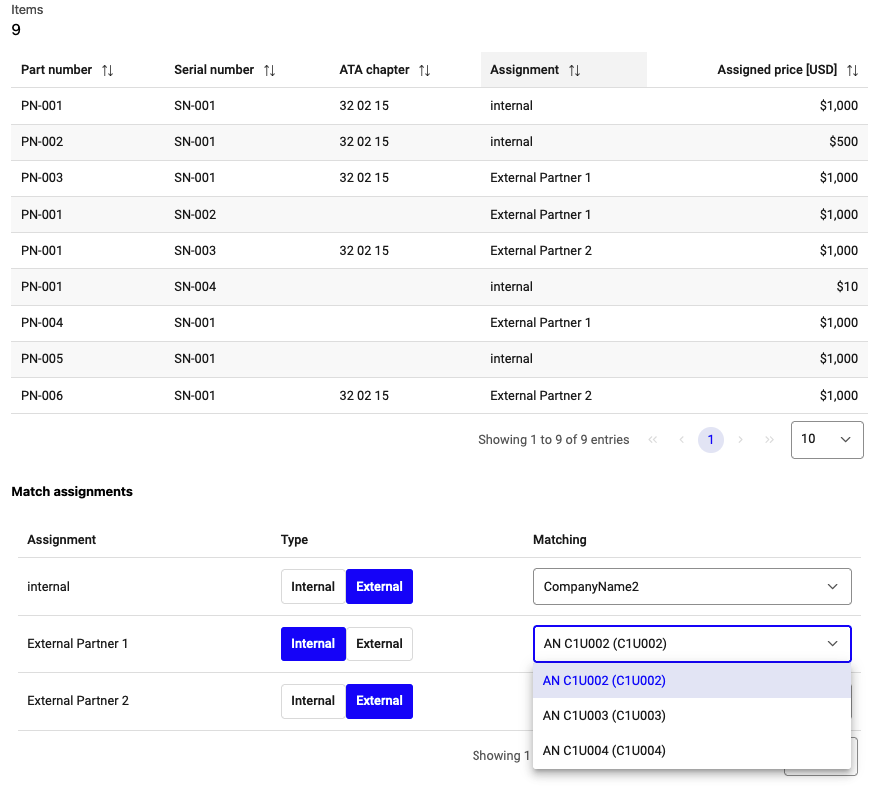
Overview of harvest list upload review & assignment matching
Below the table to review the uploaded harvest list details, a matching UI appears. Using this UI, you can match the values you have entered into the “assignedTo” column in the CSV file to existing users (internal) and companies (external). This enables MRO SmartHub to include the correct accounts as internal and external partners into the teardown project.
Note
Ensure that all provided information is accurate to ensure the teardown process proceeds smoothly.
Project Overview

Overview of existing teardown projects
The screenshot shows a project overview in the Teardown Module. At the top, there’s an optional description field and a placeholder for images related to the project.
Below is a table of updates, listing the upload time, user, and any comments provided. Each update entry gives information on the project’s progress and user remarks.
At the bottom, there’s a section to upload a new status with a comment field. This area allows users to add additional information or upload new project statuses.
Details & Timeline
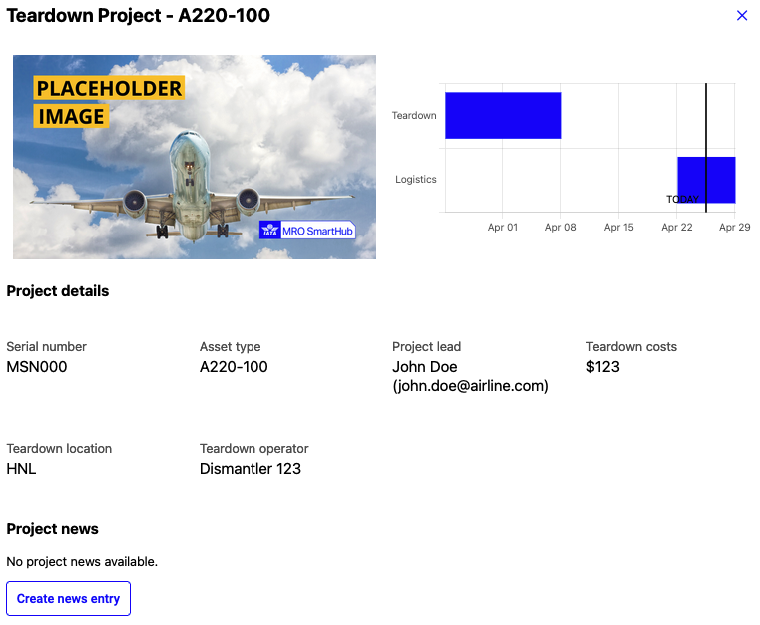
Project details after accessing teardown project
The screenshot shows a project overview in the Teardown Module. At the top, there is an optional description field and images related to the project.
Below is a table of updates, listing the upload time, user, and any comments provided. Each update entry gives information on the project’s progress and user remarks.
Clicking the “Create news entry” button allows project owners to share general updates about the project’s progress with all participants. When a news entry is added, it becomes visible to every participant, and they receive a notification about the new information.
Part List
The part list provides a comprehensive visual and interactive overview of the parts included in the current teardown project.
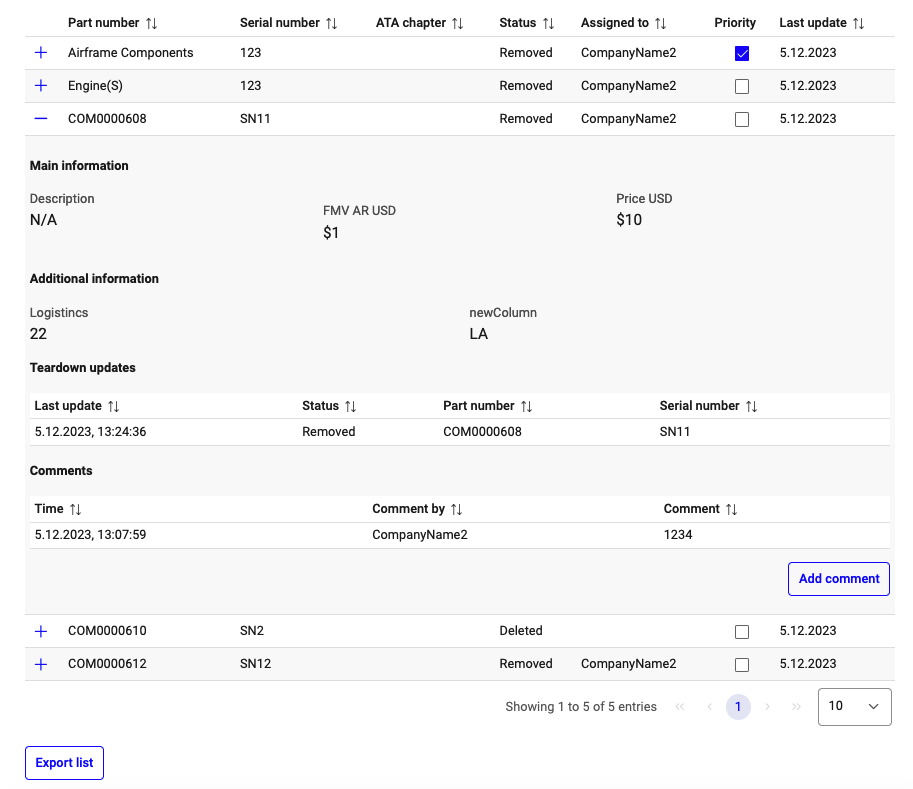
Detailed part list included in this teardown project
Progress Bar
At the top of the part list table, a bar chart represents the progress of the teardown project. It quantifies the parts according to their respective status in the project lifecycle.
Part List Table
Beneath the bar chart, the part list table displays the following columns:
Part Number: Identifier for the aircraft part.
Serial Number: Unique serial identifier for the part.
ATA Chapter: Reference to the applicable section in the ATA catalog.
Status: The present state of the part in the teardown process.
Assigned To: The user oder company assigned to the part.
Priority: A checkmark indicates a high-priority part. It can be clicked to change the priority.
Last Update: Timestamp of the last status update for the part.
Detail View
Expanding the part entry by clicking on the plus icon (+) adjacent to a part reveals more detailed information specific to that component.
Priority Management
Located at the bottom of the interface, the Download priority template and Upload priority file buttons enable the project owner to download a template will all parts on the harvest list to mark certain parts as prioritized before re-uploading.
Upload New Part Status
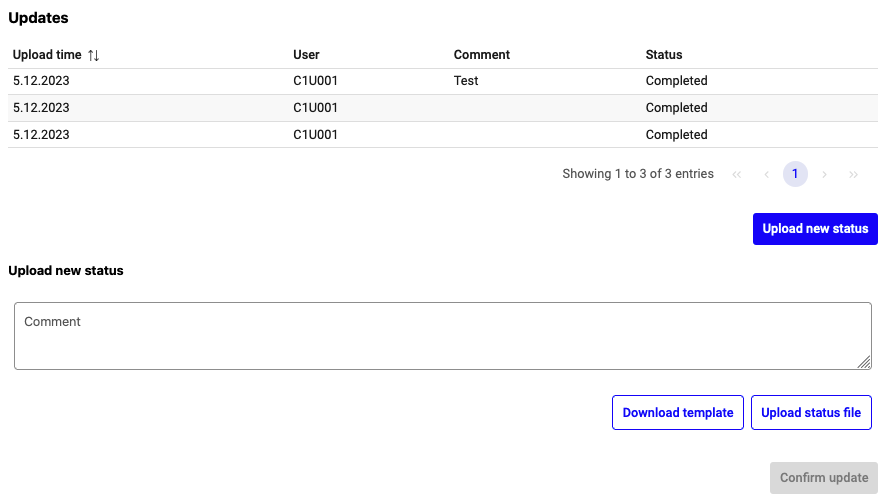
Upload new part status
The updates table lists all the status uploads for the teardown project with the following columns:
Upload Time: The date and time when the status was uploaded.
User: The user who uploaded the status.
Comment: Any comments associated with the status update.
Status: The current state of the upload, which is ‘In Progress’ if the upload has not been completed yet and ‘Completed’ otherwise.
Upload New Status
To upload a new status update:
Click on the Upload new status button to access the upload details section.
Enter any relevant comments in the provided text box.
To use the standard format for status updates, click Download template. Again, you may add additional columns that will be shown in the part details but have no function.
After filling out the template, click Upload status file to select and submit your completed status file.
The uploaded data will be displayed for review.
To confirm and finalize the upload, click Confirm update.
Note
A new status update can only be processed after all previous updates have been completed. This ensures the integrity and chronological accuracy of the project’s progress tracking.
Reviewing New Status Upload
After uploading a new part status, the project owner must review the changes. By clicking on the upload in the overview table, the following review window shows up.
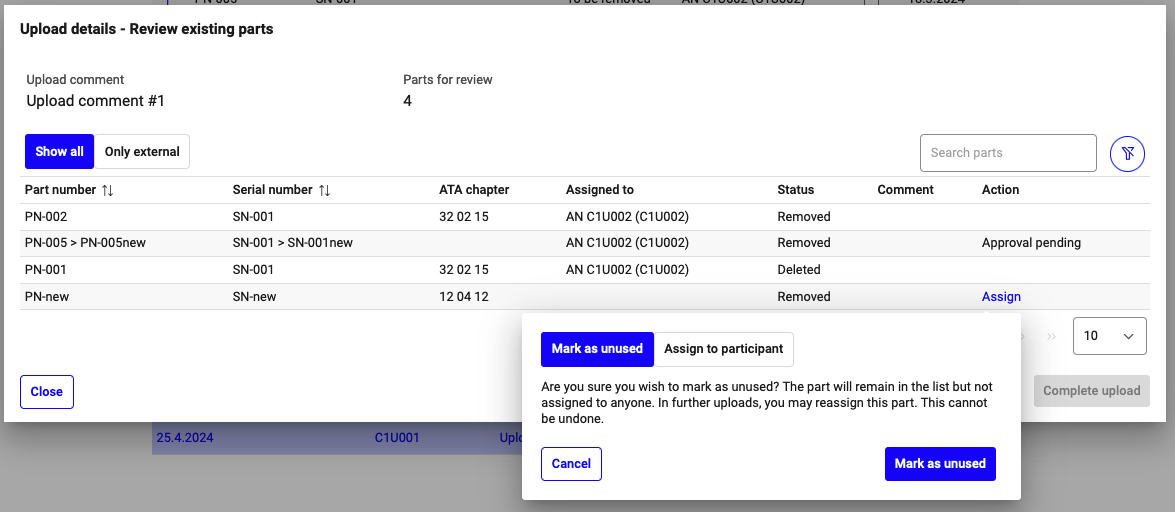
Review of newly uploaded list
The review window shows the updated information for the parts that have been changed by the last status upload. The part details are shown in the table containing the following fields:
Part number: Identifies the part. If a different part has been removed than specified, it is shown in the table as PN-old > PN-new.
Serial number: The unique identifier for the part. If a different serial has been removed than specified, it is shown in the table as SN-old > SN-new.
ATA chapter: Reference to the applicable ATA code.
Status: Current status of the part (e.g., “Removed”).
Comment: Additional remarks on the part status.
Action: Available operations, such as “Assign” if the part has been newly added to the harvest list. Or information on the feedback from the participant, such as “Approval pending”.
Handling additions - If an addition happens: a new part that was not on the harvest list before is added, the project owner can “Assign” the part or “Mark as unused”. When assigning the part, the participant and price has to be entered that should be valid for the part.
Mark as unused - Unused parts in the part list remain with a status of “unused.” In the current version of the Teardown Module, they cannot be used or re-activated. Future enhancements will address this limitation to allow re-purposing or utilizing these unused parts, which will improve the overall utilization rate for a teardown project.
Note
“Additions” can occur after participants have initially reviewed the new part list. If a “Change” (e.g., PN-old > PN-new) is declined by a participant, the original part number (PN-old) is marked as deleted, while the new part number (PN-new) is added as an addition. The project owner then has to handle the new part number to finalize the upload.
Complete upload - Completing an upload is only possible after all open items have been reviewed and handled. As long as there are open reviews, the “Complete Upload” button remains disabled.
Allowed Part List Status
The following values are allowed to describe the status of parts in the part list.
to_be_removed - Part is on the part list and should be removed by the teardown operator.
removed - Part has been removed and is stored until logistics process starts.
deleted - Part could or will not be removed from the asset or the part is damaged.
logistics - Part is being prepared for shipment.
shipped - Part has left the warehouse and is being transfered.
received - Part has been received.
Comments Section
The ‘Comments’ section shows comments from project participants, documenting the timestamp and the contributor’s identity.