Receiver
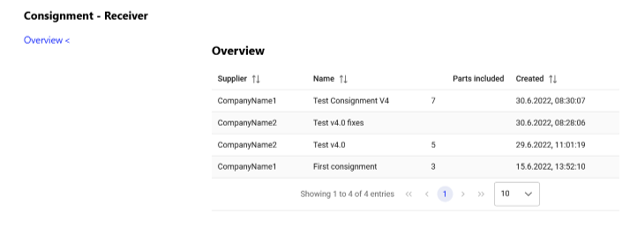
The consignment receiver is the entity in a consignment partnership that takes over the material (virtually or physically) and either utilizes the material internally or takes care about selling the material. After clicking on Receiver the overview screen shows all consignment projects for which the current company is in the receiver role.
Consignment details

Consignment supplier project overview
The overview table shows generic information and relevant KPIs about the consignment projects.
Column |
Description |
|---|---|
Supplier |
Company name of the supplier company. |
Name |
Name / short description of the consignment project. |
Parts included |
Shows how many parts the consignment contains. |
Created |
Date and time when the consignment project was initially created. |
Selecting a consignment project by clicking on the respective table row accesses the details of this consignment project.
Manage existing project
Clicking on a consignment project in the project overview table opens the details for the selected consignment project. The detail view consists of four sections: Consignment summary, Part list, Sold parts, and Comments.
- Consignment summary:
This section provides an overview of the selected consigment project.
- Part list:
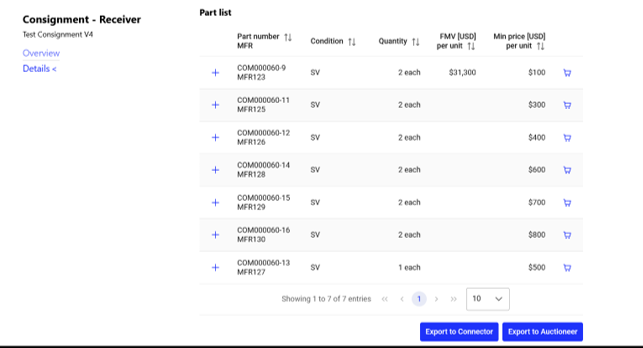
This screen shows the current material in this consignment project on part level including all relevant information about the consignment process. The main purpose of this screen is to allow the management of available material in the current consignment project.
- Sold parts list:
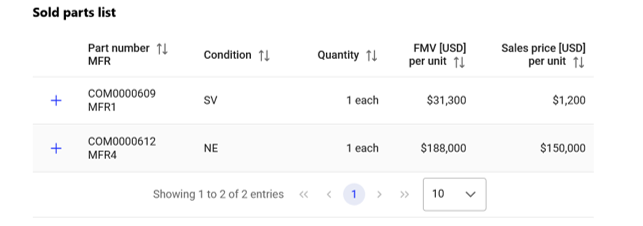
This screen shows sold material that was part of the consignment project.
- Comments:
On the end of the detail view you see all comments for this consignment. You can write your own comment can comment by clicking the Post new comment.
Clicking on the cross button in the upper right corner closes the detail view of the current consignment project and returns you to the project overview.
Part list
After material has been uploaded by the supplier, it will be available for the material receiver. The part list screen shows the current material in this consignment project on part level including all relevant information about the consignment process.

Part list screen
For each material, a set of actions is available to manage the material:
- PN details:
By clicking on plus icon on the left side a modal window shows additional information for this material: Generic material information based on the material catalogue on the
platform and part specific information that have been uploaded when adding the part to the consignment project. You can close the modal window by clicking on minus icon.
- Mark part as sold:
By clicking the shopping cart icon you can mark the selected part as sold. Selecting the icon opens a modal window for you to enter the quantity of sold parts and the sales price per unit.
It is possible to mark only a partial quantity of the supplied material as sold. IATA MRO SmartHub will then create to separate entries to document the partial sale.
The screen offers the possibility to export consignment material for two different applications: import the supplied consignment material into Connector for sale or into Auctioneer to create an auction. The format of the exports and the data included will be specific for the selected use case. After exporting the data, you may enrich the data with your individual information or adapt the pricing before importing them to the other modules. Clicking on Export to Connector or Export to Auctioneer button starts the export feature by showing a modal window where the factor on minimum price can be increase.
Sold parts list
This section shows all material that have been part of the consignment project and have already been sold by the receiver. Additional details for a sale can be accessed by clicking on the plus icon. You can close the detail view by clicking the minus icon.

Sold part list screen
Comments
The last section on this screen is the comment area. A comment is dedicated to a particular consignment project and is only accessible from inside the project. The comment screen shows the chat history showing all messages that have been sent. By clicking the Post new comment button on the right side you can enter you comment in an input field and confirm it by clicking the Post button. The header of a message contains the date and time the message was sent and the username of the sender.
By clicking reply you can answer a previous comment and create a chat conversation.